Solar Panel and Battery Connection in Different Configurations
Connecting batteries in various configurations with solar panels, charge controllers, and inverters allow you to effectively use your loads, maintain your energy storage system, fulfill your specific needs, maximize efficiency, and ensure optimal performance. Different configurations offer advantages for different scenarios. So, in this article, we are going to see the connection diagrams of batteries with solar panels, charge, controllers, and inverters in different configurations such as series connection, parallel connection, series-parallel connection, etc.
Connecting batteries in various configurations also helps to balance between solar panels and batteries involves optimizing their capacities, voltages, and connections to create an efficient and well-functioning photovoltaic (PV) system. Achieving the right balance is crucial for maximizing energy production, storage, and utilization.
Solar Panel, Battery, Inverter, and Charge Controller Connection Diagram
First of all, see the below connection diagram of a simple solar power generation setup that is generally used for domestic purposes.
Main Components Used,
- A 12V, 200W Solar Panel
- A 12V Solar Charge Controller
- A 12V, 100AH Battery
- A 12V DC/230V AC or 12V DC/120V AC Solar Inverter
Remember that here we have used random ratings to explain the connection and working concept, you may need different ratings, so take appropriate ratings as per your requirements. All the components should have the same ratings and be compatible with each other. For example, if you use a 24V solar panel then you must use a 24V solar charge controller, 2PCs 12V battery in series, 24V solar inverter, etc. Even their power ratings should be the same.
Designing a balanced system can be complex. So it is always recommended to consult with a professional solar system designer or engineer to ensure that your configuration meets your energy needs efficiently and safely.
Connection Description
- As you can see in the above wiring diagram, the two terminals from the solar panel(positive-red, negative-black) are connected to the Solar input terminals of the charge controller.
- The Battery is connected to the Battey Identified terminals in the charge controller with proper positive and negative connections.
- Here, the DC output terminals of the charge controller are left open. If you have any DC loads then you can connect here. Remember that it provides 12V DC output. Check the output capacity on your own controller before connecting any loads.
- The DC input terminals of the Solar inverter are connected to the battery.
- The AC output from the inverter can be connected to AC loads like Fans, Lights, TV, and more.
Solar Panel and Battery Rating and Connection Type Calculation
**Now coming to the main objective of this article, that is how you can match your battery with solar panels.**
First of all, it is must require that the total output voltage from the solar panels and the battery voltage should be equal.
The other important thing is to match the solar panels and battery capacity. For example, if you use a low-power solar panel and connect a high-capacity battery to the system, then the battery will take a very long time to charge, even if it may never charge fully.
On the other hand, if you use a very high-power solar panel but connect a very low-capacity battery to the system then you can't store a large amount of energy so using high powered solar panel will not give you any advantage.
So, we should always have objective maximum energy storage in the minimum time. Even we should take care of minimum installation costs also.
Generally, the system should be designed in such a way that the battery can get fully charged within 5 to 7 hours. Because generally, we get 5 to 7 hours of good sunshine in a day.
Here, in this article, we have designed our system to charge the battery fully approximately in 6 Hours.
To get the accurate result we need to do complex calculations. So here we will discuss the simple procedure and formula to get the approximate results that you can apply to design your system easily.
As, in the above diagram we have used a 12V, 200W Solar panel. That means it can deliver a maximum of 200W/12V = 16.67A current.
So if we want to charge a battery within 6 hours the battery should have the current capacity of 16.67A * 6H= 100AH. So we can use a 12V, 100AH battery for a 12V, 200W solar panel.
Let's take another example. You have a 12V, 150AH battery and you want to calculate the rating of the solar panel.
Obviously, the voltage rating of the solar panel should be 12V.
The battery capacity is 12V, 150AH means 12V * 150AH = 1800WH
We have to charge the battery within 6 hours. So the Power rating of the solar panel should be 1800WH / 6H = 300W.
So, you can use a 12V, 300W solar panel for 12V, 150AH Battery.
Remember that, this calculated charging hours applicable only when no external load is connected during charging. So, if you want to use the external load during charging time then take the solar panel rating more. For example, if you want to connect a 100W extra load during charging time then you can take 300W+100W = 400W solar panel.
Batteries in Series Connection with a Single Solar Panel
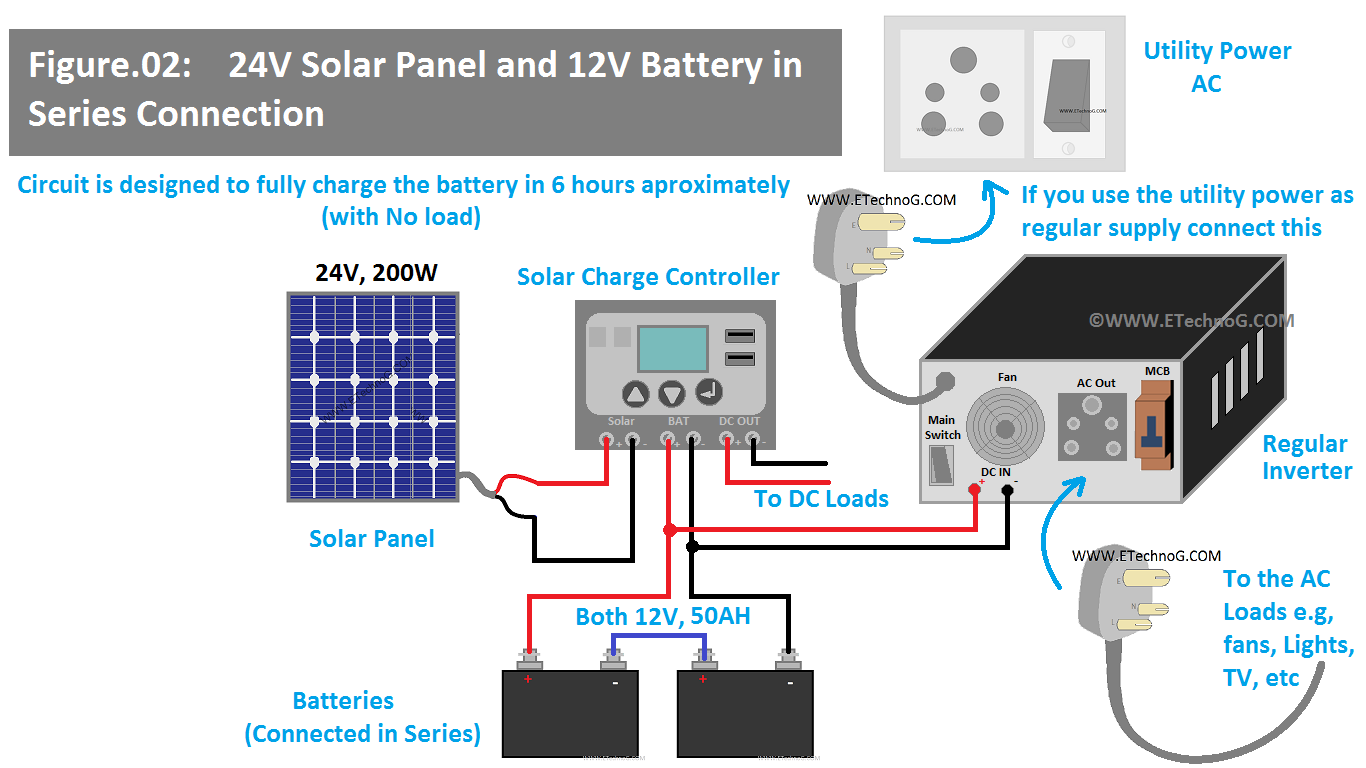
Here, we have connected two 12V batteries in series as we using a 24V Solar panel. You can see in the below diagram, we have used a normal power inverter generally used for backup. You can use a solar inverter instead of it (as shown in figure.01). Power inverters are used when you want to use solar power as backup power. This connection diagram also helps you to connect the solar system with your existing inverter system. Just install the solar panels and charge controllers then connect the Battery terminals of the charge controller to the battery that is already connected to your home inverter. Once again I told you that all the ratings should be the same.
Remember that when using a 24V solar panel all the other components such as charge controllers, inverters, and DC loads also be compatible with 24V DC.
Calculation
Solar panel rating 24V, 200W, so maximum current deliver 200W/24V = 8.33A
Both 12V, 50AH rated batteries are connected in series, so total battery capacity = 24V, 50AH
Charging hours = 50AH/8.33A = 6 Hours
Both Solar Panels and Batteries in Series Connection
Here, we have connected two 12V batteries in series and also two 12V solar panels in series for the 24V solar system.
Remember that all the other components such as charge controllers, inverters, and DC loads also be compatible with 24V DC.
Calculation
Solar panel rating 12V, 200W, as both of the connected in series total output = 24V, 400W
and the maximum current delivery 400W/24V = 16.67A
Battery Rating = 12V, 100AH, and they are also connected in series, total battery capacity = 24V, 100AH
So, Charging hours = 100AH/16.67A = 6 Hours
Single Solar Panel and Two 12V Batteries in Parallel Connection
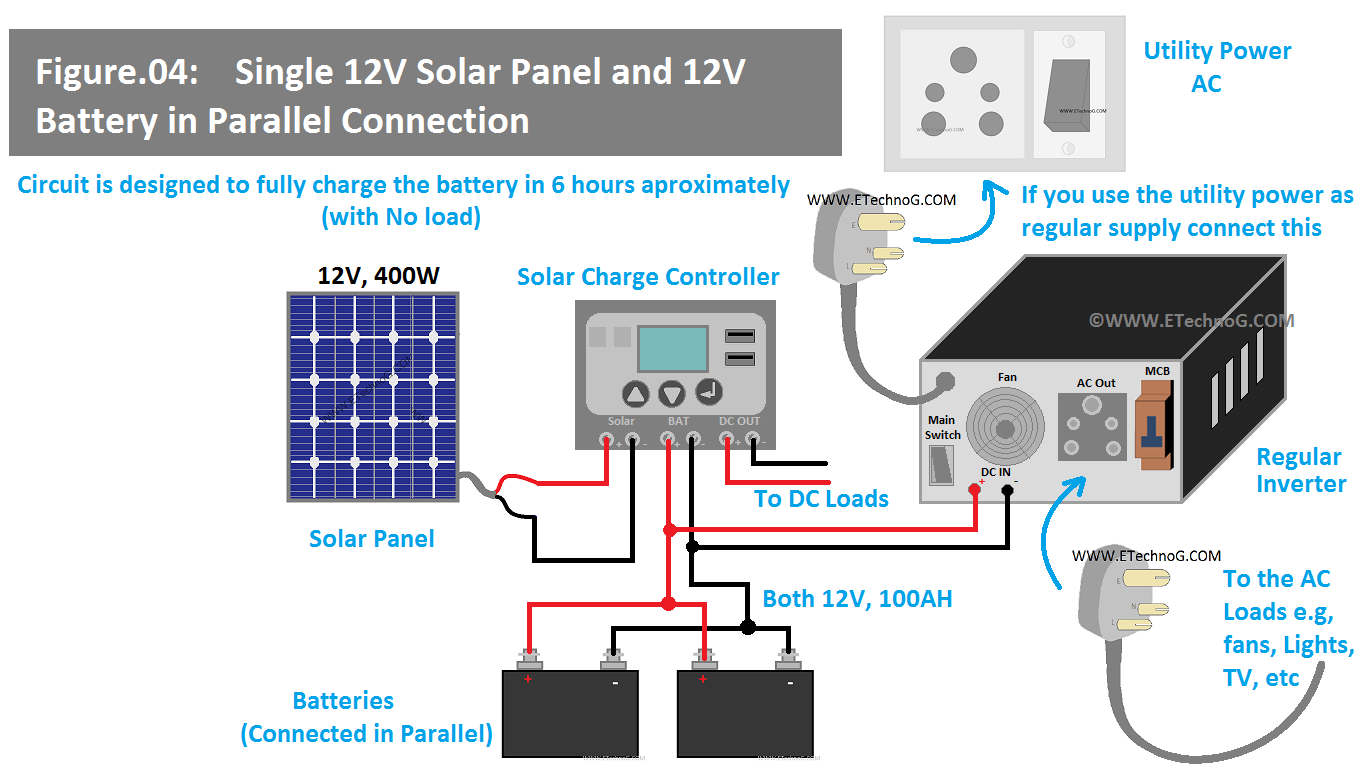
Here, we have used a 12V, 400W solar panel. So we can use two 12V, 100AH batteries by connecting in parallel to store the maximum energy.
Remember that all the other components such as charge controllers, inverters, and DC loads also be compatible with 12V DC, and especially the charge controller should be able to handle the 400W power.
Calculation
Solar panel rating 12V, 400W that means it can deliver maximum current 400W / 12V = 33.33A
Both 12V, 100AH batteries are connected in parallel which means the total capacity of 12V, 200AH
So the charging hours = 200AH / 33.33A = 6 Hours
Both Solar Panels and Batteries in Parallel Connection
Here, we have connected two 12V batteries in parallel and also two 12V solar panels in parallel to match the 12V, 400W power system.
Remember that all the other components such as charge controllers, inverters, and DC loads also be compatible with 12V DC, and especially the charge controller should be able to handle the 400W power.
Calculation
Solar panel rating 12V, 200W, as both of the connected in parallel total output = 12V, 400W
and the maximum current delivery 400W/12V = 33.33A
Battery Rating = 12V, 100AH, and they are also connected in parallel, total battery capacity = 12V, 200AH
So, Charging hours = 200AH/33.33A = 6 Hours
Single Solar Panel and Batteries in Series-Parallel Connection
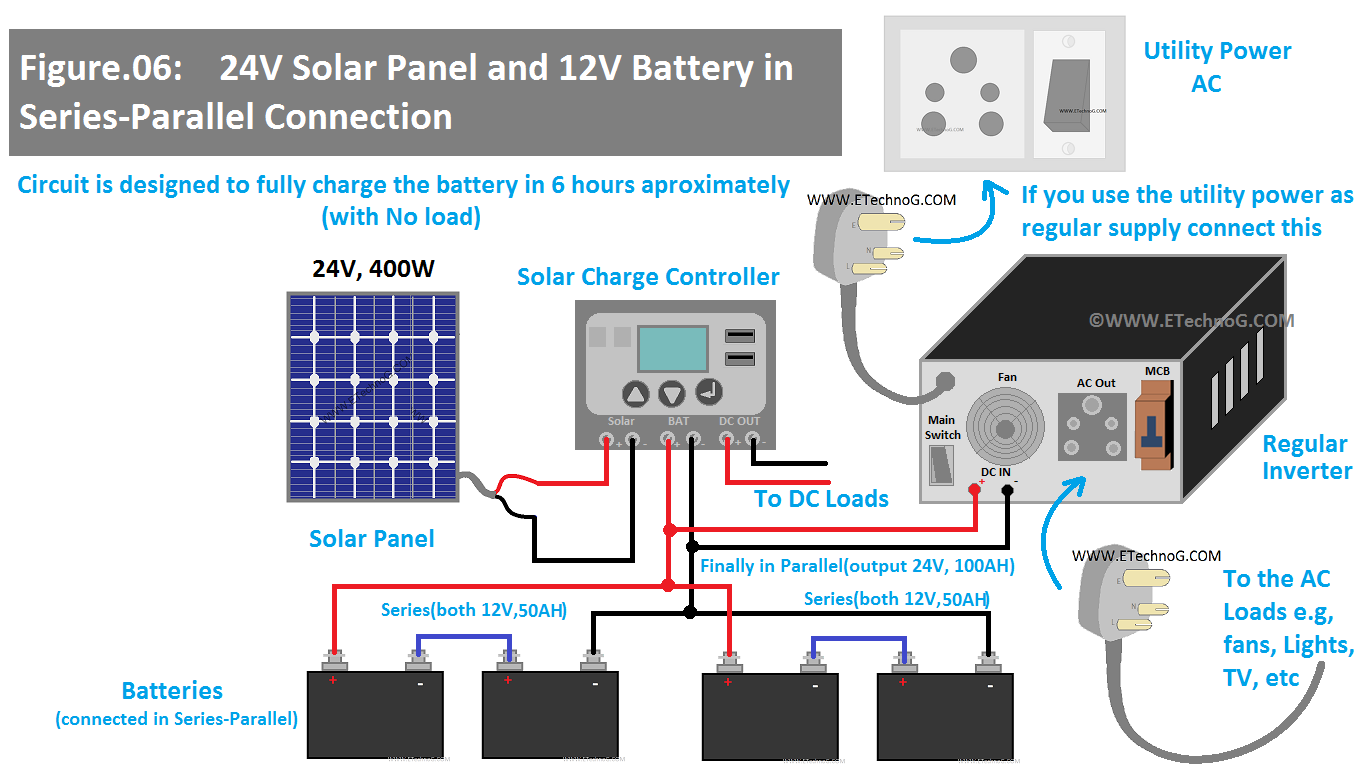
Here, we have used a 24V, 400W solar panel. So we can use four 12V, 50AH batteries by connecting in series-parallel configuration to match the voltage and store the maximum energy.
Remember that all the other components such as charge controllers, inverters, and DC loads also be compatible with 24V DC, and especially the charge controller should be able to handle the 400W power.
Calculation
Solar panel rating 24V, 400W that means it can deliver maximum current 400W / 24V = 16.67A
Battery Capacity:
In string 1, Both 12V, 50AH rated batteries are connected in series, so total battery capacity = 24V, 50AH
In string 2, Both 12V, 50AH rated batteries are connected in series, so total battery capacity = 24V, 50AH
Both strings are finally connected in parallel, so the total battery capacity with the whole series-parallel combination is 24V, 100AH
So the charging hours = 100AH / 16.67A = 6 Hours
Both Solar Panels and Batteries in Series-Parallel Connection
Here, we have connected four 12V, 100W solar panels in a series-parallel configuration. So we can use four 12V, 50AH batteries by connecting in series-parallel to match the voltage and store the maximum energy.
Remember that all the other components such as charge controllers, inverters, and DC loads also be compatible with 24V DC, and especially the charge controller should be able to handle the 400W power.
Calculation
Solar Panel Capacity:
In string 1, both 12V, 100W Solar panels are connected in series so total output = 24V, 200W
In string 2, both 12V, 100W Solar panels are connected in series so total output = 24V, 200W
So the total Solar panel output with the whole series-parallel combination = 24V, 400W that means it can deliver maximum current 400W / 24V = 16.67A
Battery Capacity:
In string 1, Both 12V, 50AH rated batteries are connected in series, so total battery capacity = 24V, 50AH
In string 2, Both 12V, 50AH rated batteries are connected in series, so total battery capacity = 24V, 50AH
Both strings are finally connected in parallel, so the total battery capacity with the whole series-parallel combination is 24V, 100AH
So the charging hours = 100AH / 16.67A = 6 Hours
Read Also:
- Solar Panel Connection Diagram and Wiring in Series(with Different Ratings)
- Solar Panel Connection Diagram and Wiring in Parallel(with Different Ratings)
- Solar Panel Connection Diagram in Series-Parallel(with Different Ratings)
- Solar Panel Wiring Diagram with Charge Controller, Battery, Inverter
- Why Diode used with Solar Panels? Blocking and Bypassing Diode
- Why Solar Panels Blue or Black in color and has many White Lines?


