Submersible Pump Starter and Water Level Controller Wiring Diagram
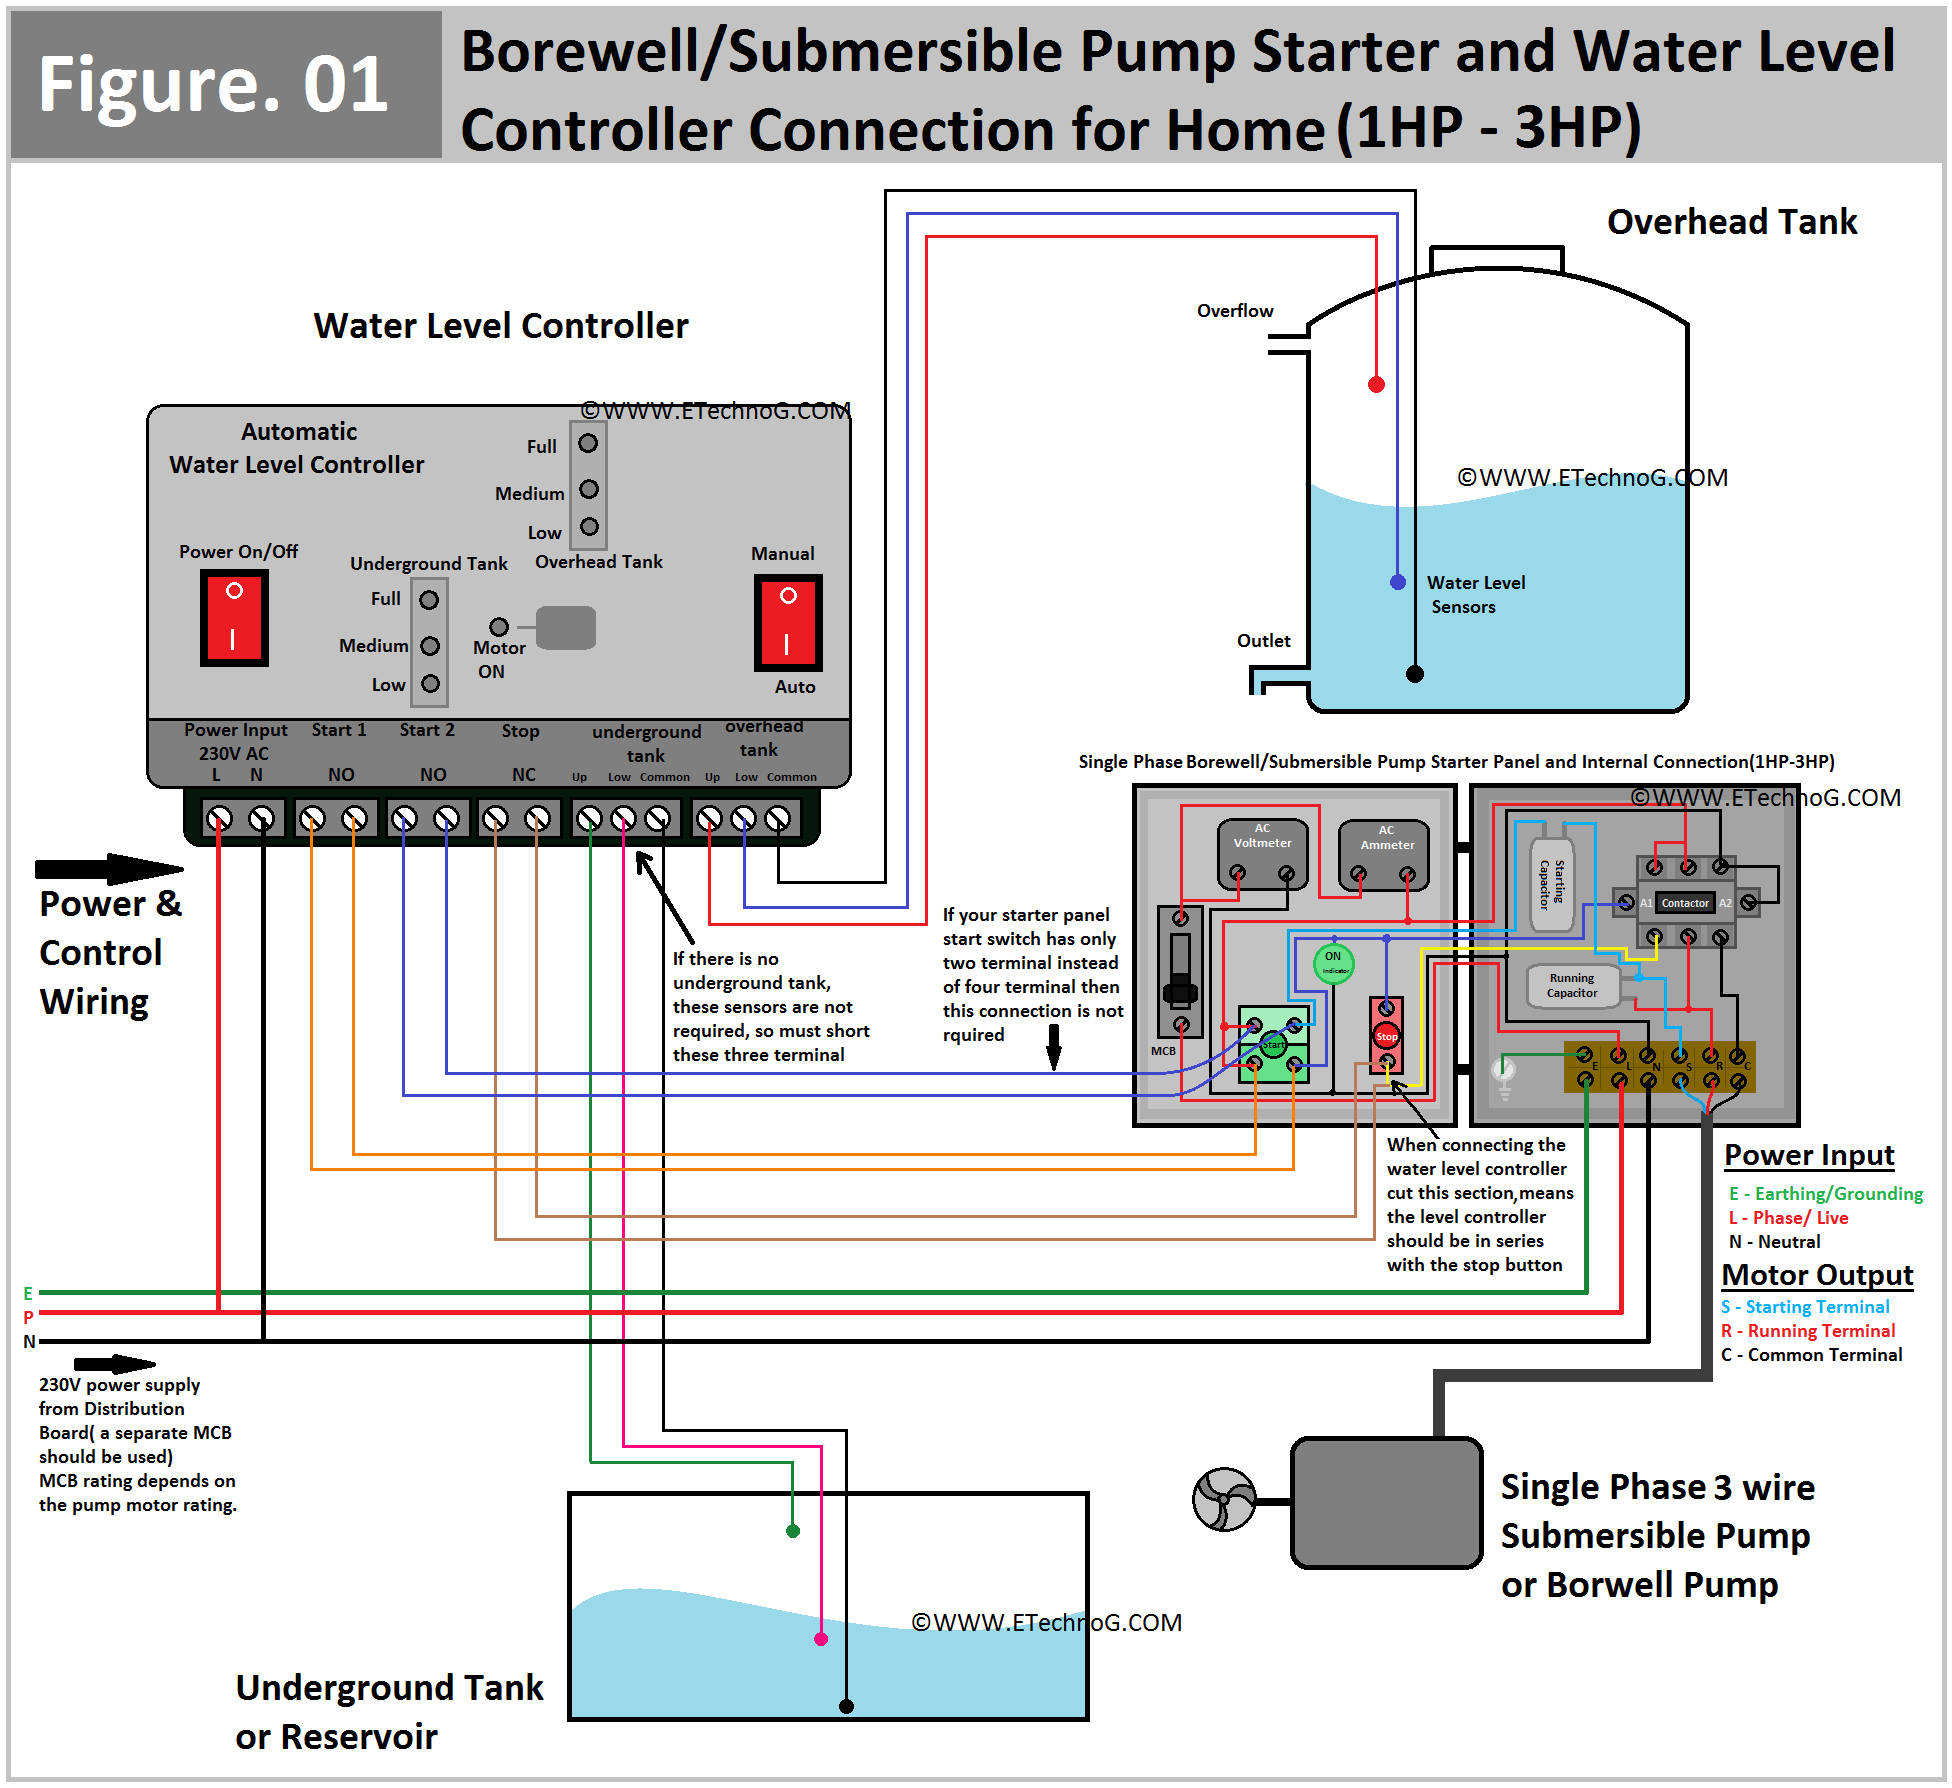
Hey, in this article we are going to see the borewell or submersible pump connection with its starter panel and water level controller. When there is a reservoir or underground tank available and we need to pump the water from the underground tank to the overhead tank, we use a normal submersible pump but when there is no underground tank and we pump water from the deep of the earth and store to the overhead tank so we used a borewell type submersible pump. Anyway here, we are going to see the wiring diagram of a 1HP to 3HP single-phase submersible pump. There are so many types of submersible pumps according to capacity, installation, area, etc. So here, we will see a wiring diagram that will help you understand any pump connection.
First of all, see the wiring diagram and connection.
Pump Motor
The pump used in this diagram has a single-phase three-wire motor. From 1HP to 3HP motors can be used with this system. The three terminals of the motor are Starting, Running, and Common.
Starter Panel
The starter panel has the following components,
- Starting Capacitor
- Running Capacitor
- Contactor
- AC Voltmeter
- AC Ammeter
- Single Pole MCB
- Start Push Button Switch(Double Pole)
- Stop Push Button Switch(Single Pole)
- On Indicator
Please zoom in on the image to see the internal connection of this single-phase submersible pump starter panel. However, when we purchased a new panel, all the internal components were connected. We just need to connect the input power supply and motor output. Generally, identification is given on the connector for connecting the motor and power supply. Remember that all the terminals should be connected properly as per the identification or instruction given in the starter panel especially, the motor terminal. You should not interchange the motor terminals.
Water Level Controller
The basic water level controller for low-capacity motors does not require more connection. You just need to connect a single-phase power supply to the controller and the motor is directly connected to the controller without any starter.
But here the starter panel and water level controller need some additional connection so you must understand it properly. Once you understand it properly, you can make connections for any type of starter and water level controller.
The water level controller used in the above diagram has a pair of input power supply terminals (phase and neutral), Start 1(basically NO contacts), Start 2(basically NO contacts), Stop(basically NC contacts), and sensor terminals for underground and overhead tanks.
Water Level Sensor
Water level sensors need to be placed properly at the means of proper height and should be connected to the proper terminals of the water level controller. For example, the sensor connected to the common terminal is to be placed at the lowest height in the tank. If you connect the sensor to the up terminal but place it at the low it will show the wrong indication so the operation also be wrong. See, the above connection diagram carefully where all the sensor placement and connections are shown properly. If you use the same arrangement then you can follow this diagram exactly.
Connection Procedure
1. Connect the single-phase power supply to the both water level controller and starter panel by identifying their input terminals. If you install it in your home then it is good to take the power supply from your home distribution board through a separate MCB. It is good to use a 25A or 32A MCB for more than a 1HP system.
2. Connect the motor terminal to the starter properly by identifying the Starting, Running, and Common terminals.
3. Find the pair of NO terminals(here marked as Start 1 and Start 1) in the controller and connect it to the parallel with the start push button switch without removing its old connection.
4. If your push button switch has two terminals only then use any one pair of the NO terminal from the controller and keep empty other pair. But if your push button switch has four terminals like in our diagram then use both NO pairs from the controller.
5. Find the pair of NC terminals in the controller(here marked as Stop) and connect them in series with the stop push button switch. It can be done by removing the connection on any one side of the stop push button. So you can connect one terminal of the controller to the push button switch and another terminal of the controller to the removed wire. See the above connection diagram for a better understanding.
6. Connect your water level sensors to the controller properly by identifying the proper terminal with respect to the proper placement of the sensor.
7. If there is no underground tank or you using a borewell pump to pump water directly from the deep of the earth, there is no need for underground tank sensors. In this case, you must short all the terminals in the controller available for the underground tank sensor.
Read Also:
- Wiring Diagram of Automatic Water Pump Controlling with Float Switch
- Portable Generator Connection Diagram with Home Power Supply
- Automatic Bathroom Light On/Off Switch Control Circuit Diagram
- Hostel Lighting System Wiring Diagram and Connection Procedure
- Street Light Wiring Diagram with Timer (Auto/Manual Operation)

