Light Switch Wiring Procedure, Connection, Diagram, Control
Hey, in this article we are going to know how to wire a Light Switch. We will know the step-by-step procedure for Light Switch Wiring. So, you can easily wire a light switch at your home, office, or anywhere. In a complete light switch connection, we have to identify the power supply terminals, identify light terminals, and identify switch terminals. After that, we have to connect those terminals in a proper and standard way. First, of all let's see the diagram for a better understanding.
Light Switch Wiring Diagram - One Way or Single Pole
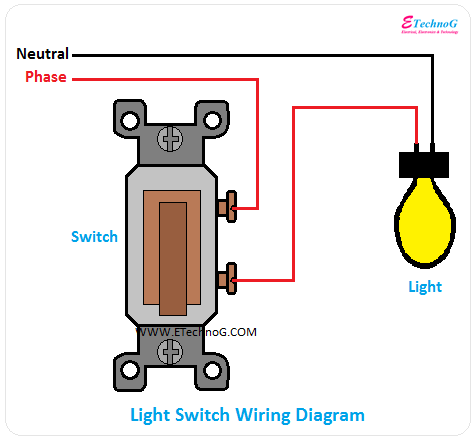
Here, you can see the wiring diagram of Light Switch single pole.
You can see, a single switch is used to control the light. So, this will slow us to control light from one place only. So, this connection is suitable within a room.
Three(3) Way Light Switch Wiring Diagram
Here, you can see the wiring diagram of light switch - 3 Way
You can see, two switches are used to control the light. So, this connection will allow us to control the light from two different places. This type of arrangement can be used in bedrooms as well as staircases, etc.
Here, you can see the three-way switch having a total of four terminals. The left side lower terminal is for grounding or earthing and another three for the load and power supply connection purposes.
Procedure for Wire a Light Switch
One Way Switch
1. Connect the neutral terminal of the power supply to the neutral terminal of the light.
2. Connect the phase terminal of the power supply to any one terminal of the switch.
3. Connect the rest terminal of the switch to the light.
Three Way Switch
1. Take two numbers three-way switch.
2. Connect the left side lower terminal of both switches to the earth or ground.
3. Connect the upper two terminals of the both switches to each other as shown in the above wiring diagram.
4. Connect the phase terminal of the power supply to the right-side lower terminal of the first switch. See the diagram for your reference.
5. Connect the right-side lower terminal of the second switch to the light bulb.
6. Connect the neutral terminal of the power supply to the light directly.
Read Also:


