Receptacle Wiring Diagram and Connection Procedure
A receptacle is basically a container or device designed to receive and hold something. The term is commonly used to refer to electrical outlets, sockets, or connectors that are built into walls, floors, or other structures, and are used to provide a point of connection for electrical devices to plug into a power source. Electrical receptacles are designed to safely deliver electricity to appliances, electronics, and other devices. Here, in this article, we are going to see the wiring diagram and connection of receptacle with different components, configurations, etc.
The receptacle helps to make the electrical connection between a power source and an electrical device through it easily and safely. A receptacle is an outlet or socket where you can plug in a device to access electrical power. The receptacle connection involves the mating of the device's plug with the receptacle's socket, creating a secure electrical connection that allows the device to draw power from the source.
A receptacle, often mounted on a wall or built into a fixture, provides an access point for electrical power. It consists of one or more socket openings where plugs from various electrical devices can be inserted. Receptacle connections are designed to be standardized, meaning that plugs and receptacles are manufactured according to specific guidelines to ensure compatibility and safety. Different countries and regions might have varying types of receptacles and plugs due to differences in voltage, frequency, and socket design.
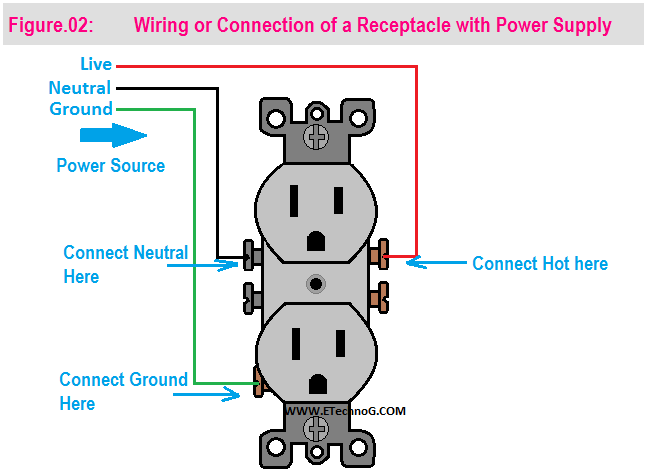
Before going to make the connection, let's identify each terminal of a standard receptacle.
As you can see in the above diagram, the receptacle has a total of five terminals. On the right side, two terminals are provided with two brass screws. Remember that both of the terminals are connected to each other. Those right-side terminals are to be connected to the live or phase power supply. Both of the terminals are required when you connect multiple receptacles in a series combination. The upper left side terminals are for the neutral. These two terminals are also connected together. These are made of silver screws. The left side lower terminal is for grounding or earthing. It is a single terminal.
A Single Receptacle Connection with Power Source
Here, you can see the wiring diagram, where a single receptacle is connected to a power source.
Wiring Procedure
- Connect the phase terminal of the power supply to the right side of any one of the screws. It is good to connect the upper side screw(the bottom side screw is to be used to connect another receptacle)
- Connect the neutral terminal of the power supply to the left side of any one of the screws. Here also it is good to connect the upper side screw.
- Connect the ground or earthing wire to the earthing screw.
Read Also:
Double Receptacle Wiring Diagram
Here, you can see the wiring diagram, where two receptacles are connected in a series combination.
Connection Procedure
- First, connect the main power supply to the upper terminals of the first Receptacle which is already explained above.
- Then connect the lower terminals of the first Receptacle to the upper terminal of the second Receptacle. See the above diagram for your reference.
Multiple Receptacles Connection in Series
Here, you can see the wiring diagram where multiple receptacles are connected in a series combination.
Wiring Procedure
- First, connect the main power supply to the upper terminals of the first Receptacle which is already explained above.
- Then connect the lower terminals of the first Receptacle to the upper terminal of the second Receptacle.
- Now, connect the lower terminals of the second Receptacle to the upper terminal of the third Receptacle.
- Follow the same procedure to connect any number of receptacles you want to connect in series.
Read Also:
Multiple Receptacles Connection in Parallel
Here, you can see the wiring diagram where multiple receptacles are connected in parallel.
Wiring Procedure
- The connection of multiple receptacles in parallel is very simple. Simply connect the phase terminal of the power supply to the right-side upper terminal of all the Receptacles.
- Connect the neutral terminal of the power supply to the left-side upper terminal of all the Receptacles.
- Connect the grounding wire to the grounding terminal of all the Receptacles.
- Following this procedure connect any number of Receptacles in parallel.
Switch and Receptacle Wiring Diagram
Here, you can see the wiring diagram, where a Receptacle is connected with an SPST switch. Here, the power supply to the receptacle can be controlled by this switch. When the switch is turned On, the receptacle will get the power supply so the connected device also gets the power supply. If the Switch is turned Off, the receptacle will be disconnected from the power supply so the connected device also be disconnected from the power supply.
Connection Procedure
- The neutral terminal of the receptacle is to be connected to the neutral terminal of the power source directly.
- The phase terminal of the receptacle is to be connected to the phase terminal of the power source in series with the SPST switch.
- Grounding connection should be provided to the both switch and receptacle.
Read Also:
GFCI Receptacle and Ordinary Receptacle Wiring Diagram
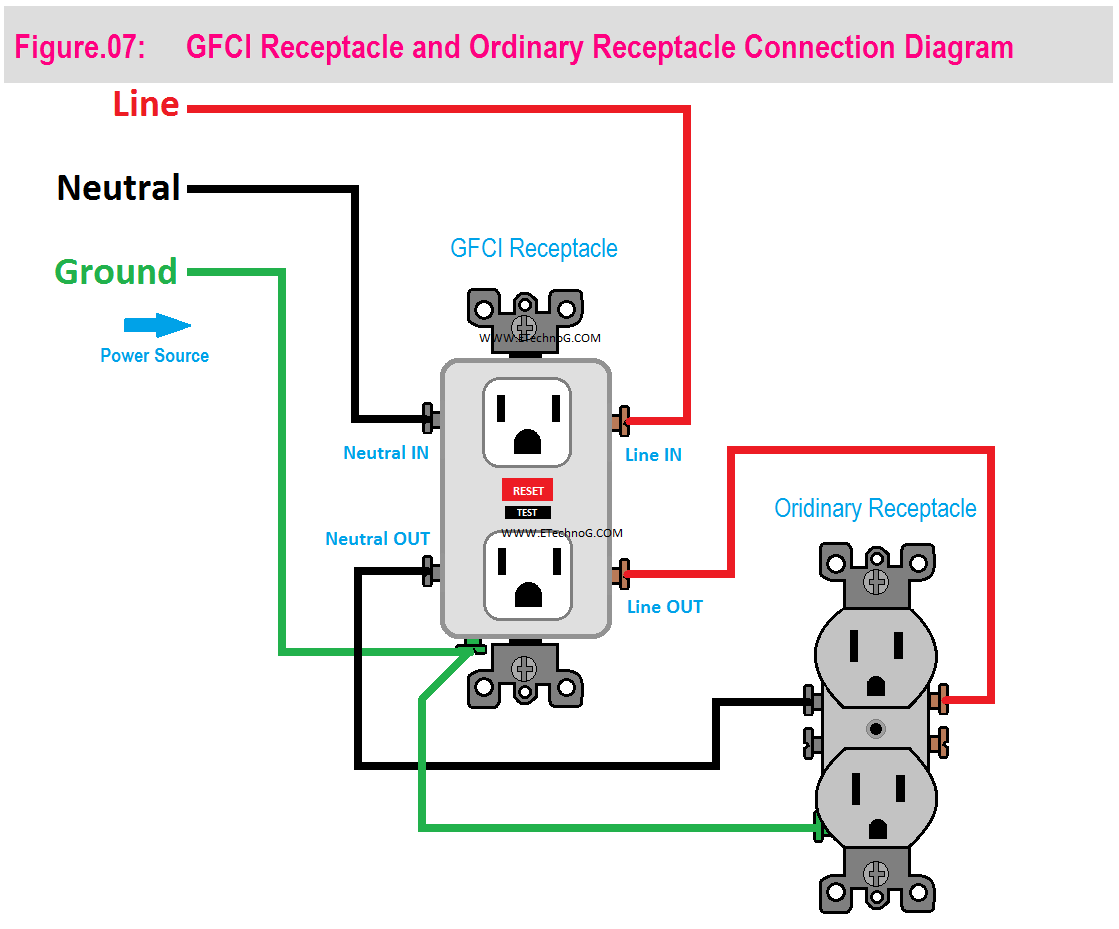
Here, you can see the wiring diagram, where an Ordinary Receptacle is connected to a GFCI Receptacle. So the Ordinary Receptacle is also Ground Fault Protected.
Connection Procedure
- Connect the power supply to the input terminals of the GFCI Receptacle.
- Connect the output terminals of the GFCI Receptacle to the input terminals of the ordinary Receptacle.
Receptacle Wiring with Switch and Light
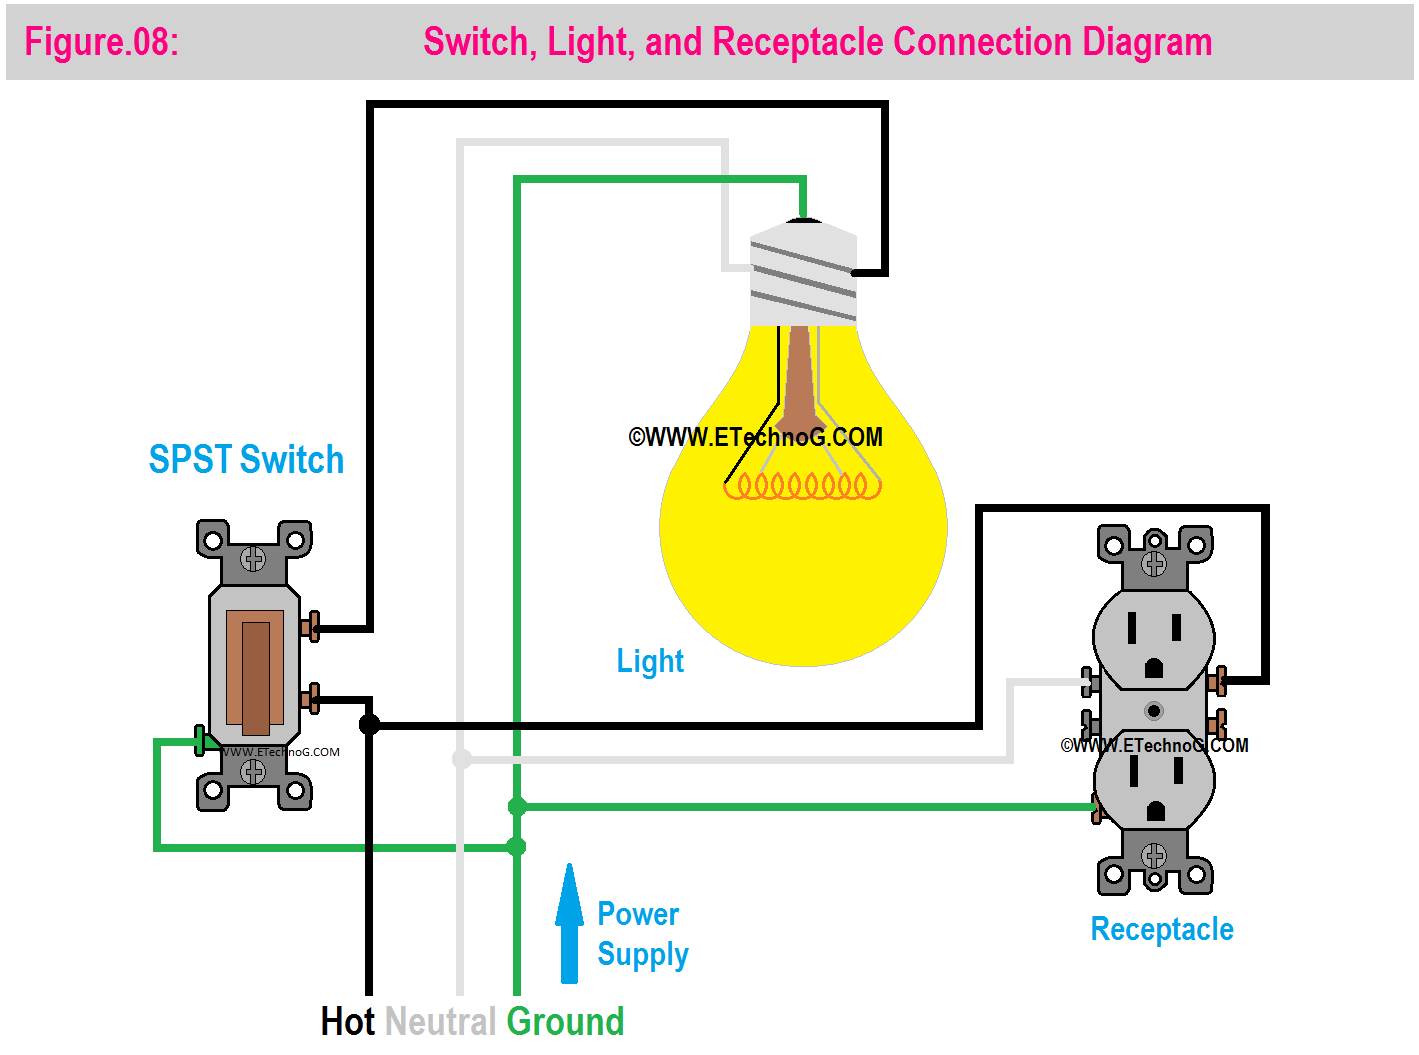
Here, you can see the wiring diagram where a Receptacle, Switch, and Light are connected.
Here, the light is connected to the power source through the SPST switch but the receptacle is directly connected to the power source. So the light can be controlled by the Switch and the receptacle will get the power supply all time. If you also want to control the receptacle using a switch then use an additional switch and connect it as explained in above figure.06.
Read Also:


