Easily Make Solar Charge Controller at Home (Circuit Diagram)
Hi, in this article, we are going to make a solar charge controller very easily at our home. A solar charge controller is basically a charge controller or solar regulator. It is a device that is used in solar power systems to regulate the voltage and current from solar panels to charge batteries safely and efficiently. Solar panels generate electricity when exposed to sunlight but the voltage and current produced by the panels can vary depending on sunlight intensity and temperature. So the charge controller is used to regulate this fluctuating energy to ensure that the batteries receive a consistent and suitable charge. Overcharging batteries can lead to damage or reduced lifespan. So the charge controller is also used to prevent overcharging by limiting the amount of charging current sent to the batteries once they reach full capacity.
Here, we are going to make a solar charge controller for a 12V solar panel and 6V battery. This charge controller will receive the variable 12V power supply from the solar panel and provide a constant 6V power supply to the battery for charging.
Component List
- 1N4007 Diode - 2 Pcs
- Preset 1 Kilo Ohm - 1 Pcs
- BC 548 Transistor - 1 Pcs
- Zener Diode 6.8V/1Watt - 1 Pcs
- Resistor 10 Ohm, 1 Watt - 1 Pcs
- Resistor 1 Kilo Ohm - 1 Pcs
- Resistor 180 Ohm - 1 Pcs
- LM 317 Voltage Regulator IC - 1 Pcs
Circuit Diagram
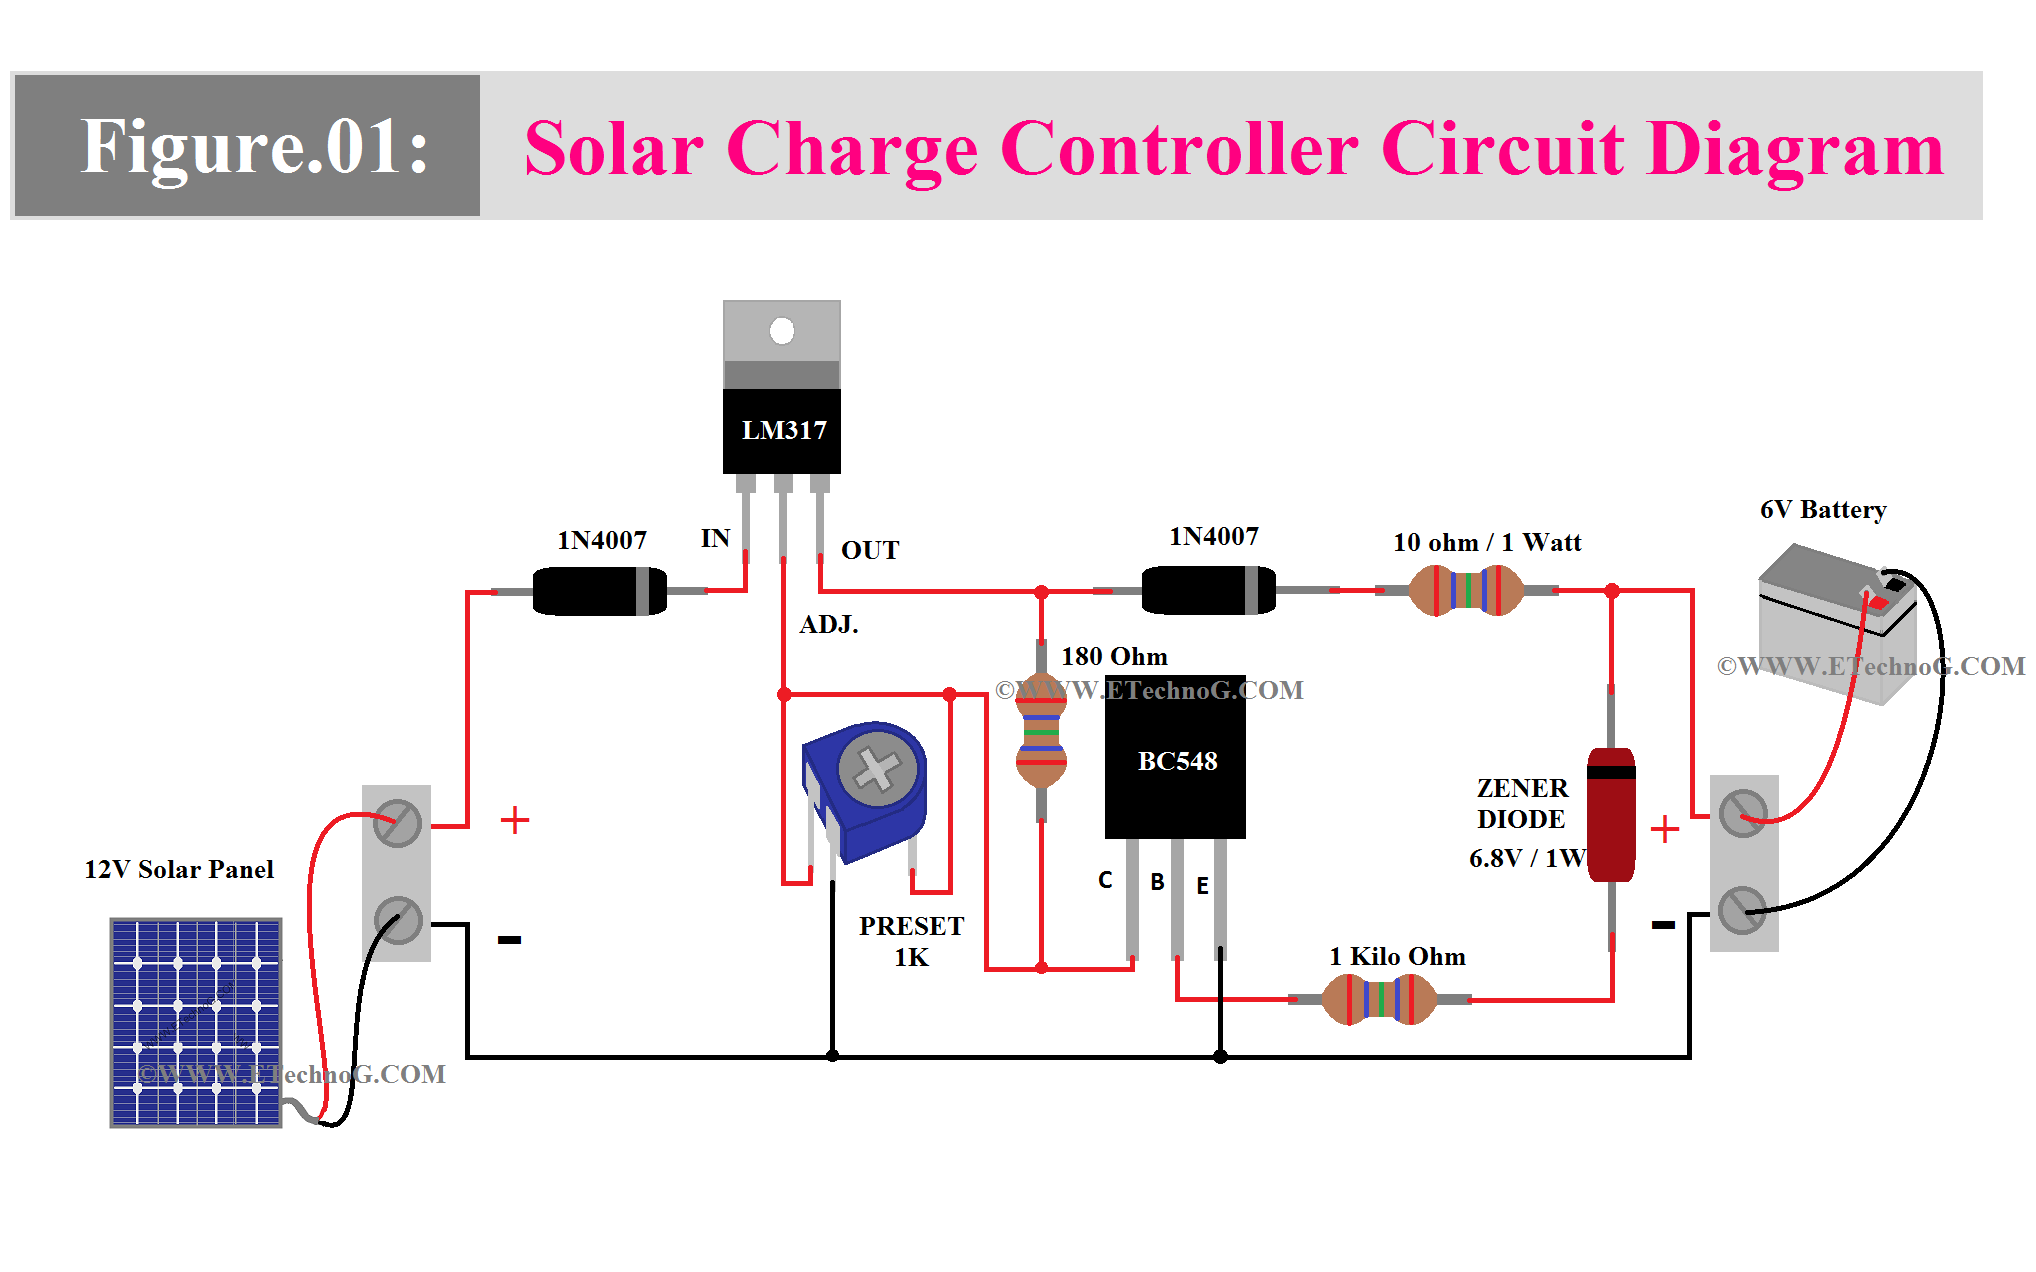
Here, you can see the circuit diagram of the Solar Charge Controller.
Working Principle
The 1N4007 diodes are used for reverse polarity protection. They prevent current from flowing back into the solar panels at night or during shaded conditions and Battery to Circuits reverse current flow. The LM317 voltage regulator IC is a versatile device that can regulate voltage.
In this circuit, it regulates the voltage output to a level suitable for charging batteries. The LM317's output voltage is determined by resistors and a potentiometer (preset) connected to its adjust pin.
The Zener diode (6.8V/1Watt) serves as a voltage reference. It helps maintain a stable voltage across the LM317 for accurate regulation. The BC548 transistor is used for controlling the charging process. Transistors can be employed to switch the charging current on and off as needed, based on the battery's state of charge. This could be achieved through the LM317's adjust pin.
The 10-ohm resistor and the 180-ohm resistor are involved in current limiting or sensing. They are part of a feedback loop to limit the current flowing into the batteries, ensuring safe charging.
Build PCB for this circuit
The first step to building a PCB for any project we need to make the proper Gerber file. Here is the below link to a detailed article regarding how you can make a Gerber file properly.
After preparing the proper Gerber file you can order PCB from any online PCB manufacturer.
First of all, visit any online PCB manufacturer's website using your web browser.
Then Look for the option to upload your Gerber files. Usually, there will be a section on the website where you can upload your PCB design files. Follow the prompts to upload your files.
These websites provide various options for customizing your PCB, including board size, thickness, layers, copper weight, surface finish, and more. Choose the specifications that match your requirements. For your circuit, you might need to specify the number of layers, board thickness, and other relevant parameters based on your design.
Decide on the quantity of PCBs you want to order. Most of the manufacturers usually offer discounts for larger quantities, so consider ordering extras if needed.
Also check for additional services such as PCB assembly, solder mask color options, and penalization. Choose any additional services you require.
Review your order details, including PCB specifications, quantity, and any additional services selected. Make sure everything is correct before proceeding.
Once you're satisfied with your order, proceed to checkout and complete the payment process.
After placing your order, you will get a tracking number to monitor the progress of your PCB fabrication and shipping. Keep an eye on your order status to know when your PCBs will arrive.
Once your PCBs arrive, carefully inspect them to ensure they meet your specifications and quality standards. Check for any defects or errors in manufacturing.
By following the above steps, you should be able to successfully order a PCB for your circuit from any online PCB manufacturing service. Don't forget to make sure to double-check your design files and specifications to ensure accurate and high-quality PCB fabrication.
The Final Step
After receiving your PCB Board, place all the components properly. After completing the component placement you can use this circuit for battery charging using solar panels.
Read Also:

